I am beyond excited to share with you all a significant milestone in my academic journey: the publication of my first scientific paper in the MDPI Big Data and Cognitive Computing Magazine! As someone deeply passionate about the fields of computer science, this accomplishment is not only a testament to my dedication, but also a realization of a long-time goal. In this blog post, I’d like to share the story behind my research and the path that led to this achievement.
This talk was recorded in German at our tarent tech conference in December last year.
Fachkräftemangel ist real! Warum also sind Softwareingenieure so oft mit stupiden Aufgaben betreut und entwickeln einen CRUD-Microservice nach dem anderen? In diesem Impulsvortrag gehe ich auf mögliche Auswege aus der Misere ein und bewerte diese aus Sicht der Kunden und Dienstleistern wie uns.
Please accept YouTube cookies to play this video. By accepting you will be accessing content from YouTube, a service provided by an external third party.
The concept of a metaverse, or a virtual world that is fully immersive and seamlessly integrates with the real world, has long captured the imagination of science fiction writers and technology enthusiasts. In recent years, there has been a surge in the development of virtual reality and augmented reality technologies, leading many to believe that we are on the cusp of realizing the metaverse.
In 2022, it was expected that the metaverse would be a fully realized and integrated part of our daily lives. People would be able to work, socialize, and even go on vacations entirely within virtual worlds. However, as we now know, the reality of the metaverse in 2022 has not quite lived up to these expectations.
The end is near, I mean the end of the year. I want to look back and reflect on my personal year.
Achievements
First public conference talk(s): At this year’s FrOSCon, I was invited to give two conference talks – on one day. That was my first time at a public conference and it went very well.
Published first print article: I could land a spot in a German IT magazine, “IT-Spektrum”. It was a long dream of mine to do this and I was very happy that it worked on the first try.
Published a web article on GraphQL: Together with Oliver I wrote an article about GraphQL Federation in microservice architectures.
The metaverse has been a hot topic in the past year. Besides the hype and the question, of whether it will be the next big thing or just another failed technology (such as 3D TV), it could be asked if the metaverse is multimedia. The following is a formal verification of this question. First, a description of the metaverse is needed, followed by a definition of multimedia and finally, the verification of the metaverse is multimedia.
What is the Metaverse
It isn’t easy to describe the metaverse precisely, because it is under heavy development. The term was coined in Neal Stephenson’s novel Snow Crash. Over time, it went through some iterations until the current climax, decided to rebrand to meta and go all in into the metaverse. Avi Bar-Zeev visualized the different stages of the metaverse perfectly.
As the metaverse is under development, the width of the definition is broader. Mystakidis defined the metaverse as follows:
“The Metaverse is the post-reality universe, a perpetual and persistent multiuser environment merging physical reality with digital virtuality. It is based on the convergence of technologies that enable multisensory interactions with virtual environments, digital objects and people such as virtual reality (VR) and augmented reality (AR). Hence, the Metaverse is an interconnected web of social, networked immersive environments in persistent multiuser platforms. It enables seamless embodied user communication in real-time and dynamic interactions with digital artifacts. Its first iteration was a web of virtual worlds where avatars were able to teleport among them. The contemporary iteration of the Metaverse features social, immersive VR platforms compatible with massive multiplayer online video games, open game worlds and AR collaborative spaces.” [1]
Among the trending things in technology is the Metaverse. It lacks a precise definition, but in short, it is a perpetual digital multiuser space, involving virtual and augmented reality. VR and AR technologies have been developing slowly in the last 10 years, so why is Metaverse trending? A boost was given by Mark Zuckerberg and his decision to go all in with the metaverse. The rebranding of the company from Facebook to Meta is a bold step, echoing in the whole internet industry. Some people see it as not less than the next generation of the internet (Reference). So the metaverse is trending, and it is neither a simple thing nor a new thing. So this article peeks into this topic with a lot of its dimensions.
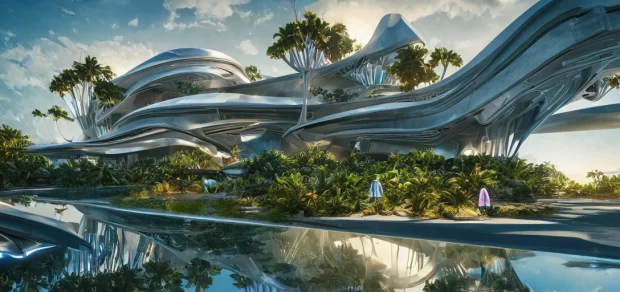
The metaverse is a collection of virtual worlds, like this futuristic 3D world, generated by stable-diffusion.
I scored a second speaker spot at this year’s FrOSCon. Completing my Master, I wrote a thesis about Parallel Graph Code Algorithms. I modelled algorithms and programmed prototypes for CUDA and POSIX threads. The results show a huge speedup. My research on concurrency has taught me a lot of basic knowledge of CUDA and GPUs. I put all in a talk which was recorded (in German).
It’s been a while… this year I had a talk at the Free and Open Source Software Conference (FrOSCon) about serving multiple frontends with a single (GraphQL) API. The talk was recorded (in German). I wanted to share it with the rest of you.
For those of you that are not familiar with GraphQL, here’s a bit of an intro. GraphQL is a query language for APIs, usually based on HTTP. It allows the requesting client to specify the wanted attributes in the request. Hence, it does not transmit too much or too little information and solves under and over-fetching happening with REST APIs. There is a lot more in GraphQL. Just hit the play button.
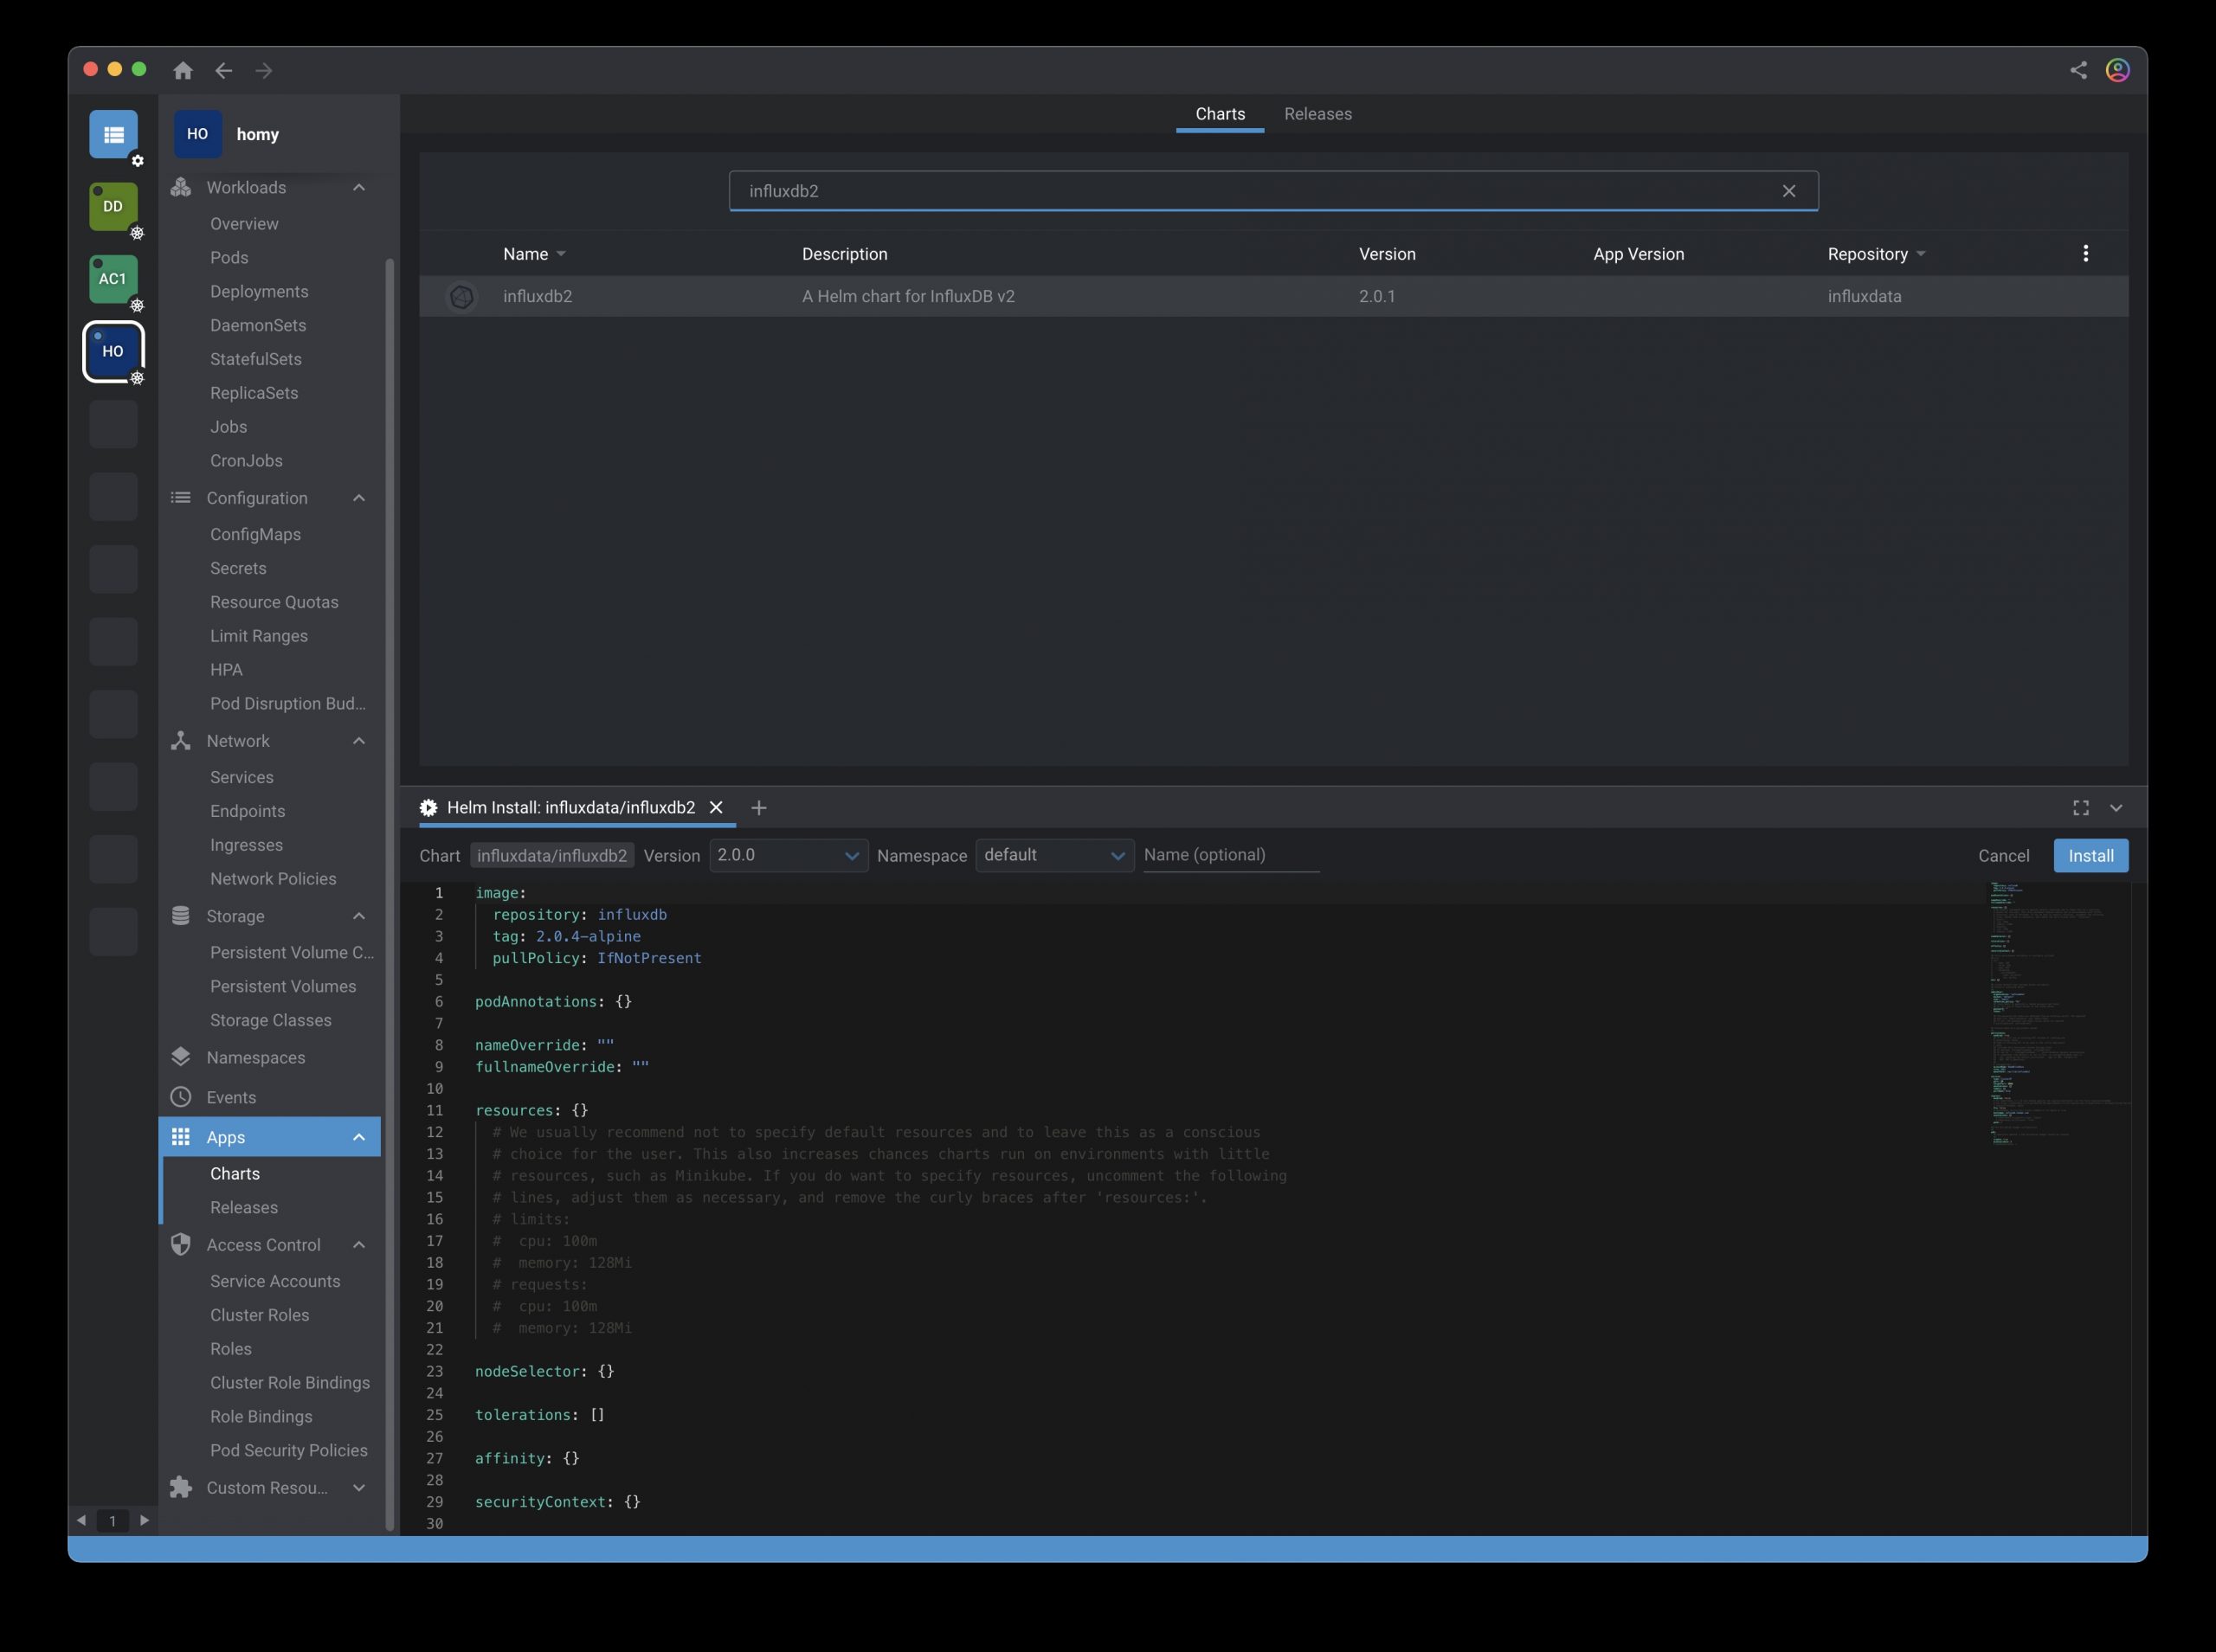
I wanted to install InfluxDB 2 on a RaspberryPi 4 in Kubernetes for my home lab setup. I found out, this is not too easy because of 64bit OS and Influx Helm charts. Therefore, here is the comprehensive guide to installing Influx on k8s.
Prerequisites
Image Credit: https://www.raspberrypi.org/ / CC BY-SA (https://creativecommons.org/licenses/by-sa/4.0) via Wikimedia Commons: https://commons.wikimedia.org/wiki/File:Raspberry_Pi_4.jpg
I have used the Raspberry Pi 4 Model B(*) for my experiments, but this should also work with the Raspberry Pi 3. The newer RPIs are needed because of the 64-bit architecture because Influx just provides Docker images for 64-bit ARM. Of course, I learned this the hard way.
It is also necessary to install a native 64-bit OS on the RPI. This can be Raspberry Pi OS (64-bit beta) or Ubuntu Server (untested). It won’t work if you just set the 64-bit flag on the boot command line. The kubernetes (or helm) architecture selection mechanism will fail in this case.
For Kubernetes, I used a plain k3s (v1.19.15) installation via k3sup. I used Helm (v3.5.4) on a remote machine for the installation.
Installation of InfluxDB 2 in Kubernetes
I used the helm charts from Influx itself. They have some flaws, but in the end, they worked. I also tested with the bitnami help charts, but they didn’t work because of a missing image for ARM architecture. This can maybe be fixed manually, but I was happy with the Influx charts.
To use the helm charts, you need to add the repo to helm:
Then search for the influxdb2 helm chart. I have used Lens for this step.
At the time I’ve tried, version 2.0.1 of the helm chart was the latest. This chart didn’t work because of a wrong file path (https://issueexplorer.com/issue/influxdata/helm-charts/350). Version 2.0.0 worked fine despite a minor older version of the InfluxDB.
Additional to the helm charts, I have set up an ingress to access influx UI from the outside. You need to replace the serviceName with the generated service name (auto-generated from the helm chart process).
This way I can access the InfluxDB 2 on the Raspberry Pi 4 through the Kubernetes. A drawback is the missing custom base path of influx. Therefore, you can’t use another path other than the root for the ingress rule.
I hope this helps you to set up InfluxDB 2 on the Raspberry Pi 4 in Kubernetes. Let me know if you have struggles or tips for even better ways.
Recently I bought an NVidia Jetson Nano board and a fan for a side project. It is about machine learning with training and inference. Therefore, the CPU and GPU will work a lot and get hot! I searched the web for the right fan and I found the Noctua NF-A4x20 PWM (Amazon*) is recommended. A perfect product: low noise, rubber decoupling, good performance.
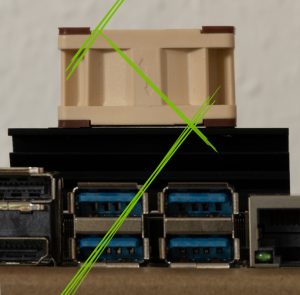
As it was delivered, I installed it immediately – of course. The question was: which direction?
So I did some tests in both fan directions. Running a high CPU intense compilation, the performance was better in the downward direction.
Jetson Nano fan – comparison CPU test.
Upward
Downward
44°C
40°C
Upward / Downward according to the arrow on the side of the Noctua NF-A4x20 PWM fan.
It is just a few degrees of difference. But it will count if you do training on the Jetson Nano. I did a couple of TensorFlow training jobs which took 12-19 hours. CPU & GPU got very hot, and the fan has cooled the NVidia Jetson Nano like a charm. By the way, I used the 4GB version, but I think the cooling performance and temperatures are the same as the 2GB version.
I also tried the non-PWM version of the fan with the same results. But since the fan is always on without PWM, it is fairly noisy. With the PWM version, the fan usually runs with just 33% of the maximum power.
So I hope this helps for your Noctua NF-A4x20 PWM fan installation: recommended direction is downward according to the arrow printed on the side of the fan.

 In 2022, it was expected that the metaverse would be a fully realized and integrated part of our daily lives. People would be able to work, socialize, and even go on vacations entirely within virtual worlds. However, as we now know, the reality of the metaverse in 2022 has not quite lived up to these expectations.